Once you've logged onto Moodle, select the class that you want to upload the assignment(s) for.
In the top right hand corner, under your name, click on the button that says "Turn editing on".
Now you're able to edit your course.
On the right hand side of the week you want to add the assignment to, there will be two drop-down boxes. The first one says "Add a resource..." and the second says "Add an activity...” Click on the arrow next to the box that says "Add an activity..." and select the activity type you want to add.
There are four different types of assignments:
- Advanced uploading of files
Allows each student, as well as yourself, to upload multiple files in any format. It would be a good choice for ongoing projects (allowing students to upload multiple drafts, notes, etc.).
- Online text
Allows students to only input text. It does not allow students to upload files. Grading can be done online, as well as adding comments for the students.
- Upload a single file
Allows students to upload a single file in any format.
- Offline activity
Allows you to post a description of the assignment for students to do offline. Does not allow for any uploading.
Once you've selected your activity, you're taken to a new page where you can add the assignment name, description, and change several other factors.
After you've added the assignment name and description, you can set the amount of points you want the assignment to be worth.
Next are the dates the assignment is available, meaning when the students can start uploading their files/work to when the deadline is. There's also an option to disable the dates.
Now we have the option of allowing students to submit late work. The default setting is no, but you can change it if you'd like.
The next several boxes give you the option of allowing students to resubmit work (default is no), email alerts to the teachers of the class (again, the default is no), set the maximum size of the file(s) being uploaded (the default is 1MB).
Under the "Common module settings" heading, there's a "Visible" option. This determines whether students can view the assignment or not.
Once you're happy with your assignment, you can either click "Save and return to course" or "Save and display" to display the assignment as a student would see it.
Now you're all set to add activities to your Moodle page!
Thursday, April 19, 2012
Thursday, February 23, 2012
What is Photoshop and How Do I Use It?
People ask me that question all the time… Well, not really but I’m sure they want to. My reply (hypothetically of course) would be something along the lines of “Photoshop is a photo editing tool used to possibly create pure magic.” The magic part at least, is what the website says. I would have to agree with them on that though. In all seriousness, it’s a really fun, really helpful tool that can be used to create just about anything – from posters to… Well, whatever you want. The possibilities are endless. And so are the features. It’s claimed that it’s almost impossible to learn all the features, and I don’t doubt that. I’m continually finding cool new things.
But enough of this. I’m going to show you how to edit your profile picture using Photoshop. It’ll provide the training ground for your long and magical Photoshop career.
The first thing we’re going to do is open Photoshop, which is done by either clicking on the desktop icon (if there is one)

or by Start -> All Programs -> Adobe Master Collection CS5 -> Adobe Photoshop CS5

Once it’s opened, we need to select and open the photo we want to edit. To open a picture for editing, we can either drag and drop the photo into Photoshop or we can (in Photoshop) click File -> Open -> (folder where your picture is) -> (name of your picture) -> Open.
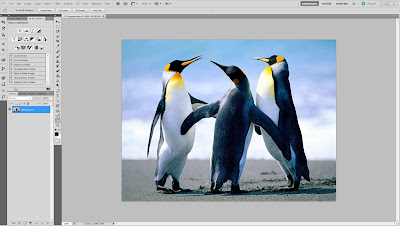
Your screen should now look like this (except with your picture instead of penguins):
Now is the part where your possibilities really open up. We have so many choices to choose from. Let’s say there’s someone (or something) in the picture that you want to edit out. We’ll start by learning how to crop. On the left hand side of the screen, you should see a button that looks like this:

That’s the cropping tool. Click on it and then click and drag the cursor over the parts of the picture you want to keep, so when you release the mouse button the part you want to get rid of is darker than the rest. Don’t worry if you didn’t get it just right – you can use the resizing boxes to make the area you want to keep bigger or smaller.

Once you’re happy with the size, double click anywhere on the highlighted part to crop the picture.

Congratulations! You’ve just cropped your first picture in Photoshop.
Now let’s say you want to add text to your photo. You want to start by clicking on the Type Tool icon, which looks something like this:

With that selected, click and drag a box anywhere on your picture.

Now, type the text you want to appear. Once again, we have the resizing boxes for your editing pleasure. We also have, at the top of the screen, options for changing the font, size, color, alignment, and font style. There’s also a text orientation and text warp feature. Text orientation changes the direction of your text (horizontal to vertical), while text warp allows you to warp your text into different shapes.

So, for this tutorial, we’re going to warp our text into the shape “Rise”.

We still have more options, both for our text and/or our picture. On the right hand side of your screen, you should have a panel that looks like this:

At the top, click on “styles”. Now we can add effects to our text by clicking on any of the little boxes. For this tutorial, we’re going to use the “striped cone” button (top row, fourth button). Some of these buttons will work on your picture. To do this, though, we have to make a copy of the background layer.
On the bottom of the panel, you should have a box that looks something like this:

There will be a little lock icon on the side (meaning that the layer is locked). We can’t make too many changes with a locked layer, so we’ll make a copy of it. We do this by right clicking on the layer and selecting “duplicate layer”.

Now, a box will pop up that looks like this (except with your file name):

You can change the layer name if you want. I usually leave it as the default ("background copy"). After you select “OK”, we need to delete the locked layer, which is done by right clicking on it and selecting “delete layer” followed by “OK”.
Once that’s done, we can play around with the style of the picture like we did with the text. For this tutorial, we’re going to go with “sun faded photo”.

And that’s it! We’ve just covered some of the basics of Photoshop and now you know how to do a little editing for your profile pictures. Happy Photoshopping!
But enough of this. I’m going to show you how to edit your profile picture using Photoshop. It’ll provide the training ground for your long and magical Photoshop career.
The first thing we’re going to do is open Photoshop, which is done by either clicking on the desktop icon (if there is one)

or by Start -> All Programs -> Adobe Master Collection CS5 -> Adobe Photoshop CS5

Once it’s opened, we need to select and open the photo we want to edit. To open a picture for editing, we can either drag and drop the photo into Photoshop or we can (in Photoshop) click File -> Open -> (folder where your picture is) -> (name of your picture) -> Open.
Your screen should now look like this (except with your picture instead of penguins):

Now is the part where your possibilities really open up. We have so many choices to choose from. Let’s say there’s someone (or something) in the picture that you want to edit out. We’ll start by learning how to crop. On the left hand side of the screen, you should see a button that looks like this:
That’s the cropping tool. Click on it and then click and drag the cursor over the parts of the picture you want to keep, so when you release the mouse button the part you want to get rid of is darker than the rest. Don’t worry if you didn’t get it just right – you can use the resizing boxes to make the area you want to keep bigger or smaller.

Once you’re happy with the size, double click anywhere on the highlighted part to crop the picture.

Congratulations! You’ve just cropped your first picture in Photoshop.
Now let’s say you want to add text to your photo. You want to start by clicking on the Type Tool icon, which looks something like this:
With that selected, click and drag a box anywhere on your picture.

Now, type the text you want to appear. Once again, we have the resizing boxes for your editing pleasure. We also have, at the top of the screen, options for changing the font, size, color, alignment, and font style. There’s also a text orientation and text warp feature. Text orientation changes the direction of your text (horizontal to vertical), while text warp allows you to warp your text into different shapes.

So, for this tutorial, we’re going to warp our text into the shape “Rise”.

We still have more options, both for our text and/or our picture. On the right hand side of your screen, you should have a panel that looks like this:

At the top, click on “styles”. Now we can add effects to our text by clicking on any of the little boxes. For this tutorial, we’re going to use the “striped cone” button (top row, fourth button). Some of these buttons will work on your picture. To do this, though, we have to make a copy of the background layer.
On the bottom of the panel, you should have a box that looks something like this:

There will be a little lock icon on the side (meaning that the layer is locked). We can’t make too many changes with a locked layer, so we’ll make a copy of it. We do this by right clicking on the layer and selecting “duplicate layer”.

Now, a box will pop up that looks like this (except with your file name):

You can change the layer name if you want. I usually leave it as the default ("background copy"). After you select “OK”, we need to delete the locked layer, which is done by right clicking on it and selecting “delete layer” followed by “OK”.
Once that’s done, we can play around with the style of the picture like we did with the text. For this tutorial, we’re going to go with “sun faded photo”.

And that’s it! We’ve just covered some of the basics of Photoshop and now you know how to do a little editing for your profile pictures. Happy Photoshopping!
Tuesday, January 24, 2012
Library Toys
Here in the O'Grady Library, we have some pretty nifty toys.
Gorillapod (3)
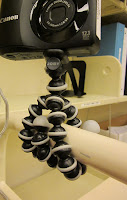 I have to say, out of all the toys, I think this one might just be the coolest. Sure Kindles are like whole libraries in the palm of your hand and Flip Videos take awesome videos, but they ain't got nothin' on Gorillapods. It's a mini, flexible tripod that completely bends and rotates 360 degrees! What could be cooler?! It goes where most tripods can't: around a tree branch, around a pole, pretty much where ever you want. They even come in different colors!
Library Catalog
Loan Period: 2 days
If you're looking for something bigger, we also have regular tripods.
The loan period on them is also 2 days.
Kindle (1)
 Oh yeah, we've got a Kindle. What should you know about it? Well, let's see: it's simple to use, the battery life is really good, it weighs less than 6 ounces, you can take it just about anywhere, it holds over 1,000 books (some of which are free), and you can even borrow from your public library! Of course, there's more features that I haven't listed, so I recommend you check this out for yourself.
Library Catalog
Manual
Loan Period: 3 weeks
Flip Video (10)
 A lightweight, easy to use, handheld video camcorder that, according to the website, is "tagged as one of the best-selling devices in the market today, it boasts of the highest recording and playback quality and the most user-friendly controls." It's pretty easy to use. When you're ready to shoot, just push the big red record button and point at what you want to capture. Push the red button again when you want to stop the recording. I must say, the video quality is very good. The recording time ranges from one to four hours, depending on your model. I'd say the major drawback is that all the videos are recorded in .mp4 format, which means you would have to install a codec (video compatibility software). It's not a big deal, and one of the models even comes with pre-loaded software to install the codec automatically.
Library Catalog
Manual
Loan Period: 2 days
miniDV Camcorders (4)
 The website dubs these camcorders "a perfect balance of style, performance and affordability." With 35x Optical Zoom, advanced image stabilizaion, widescreen HR recording, "perfect exposures" and "easy operation", it seems you can't go wrong with this camcorder. It runs on a recharable battery pack, so just plug it in when you get low on juice.
Library Catalog
Manual
Loan Period: 2 days
Digital Cameras (8)
 There are several different types of Canon Powershot digital cameras (my personal favorite being the A1200) in the library. These little guys have great features like: 4x optical zoom, face detection, 12.0 Megapixels, and low light setting. There are also creative filters that let you add effects to your pictures. The cameras run on AA batteries, so no need to worry about keeping a charge (just pop a new one in as needed!).
Library Catalog
A510 Manual
A560 Manual
A1200 Manual
Loan Period: 2 days
Laptops (8)
 From the website, "the Latitude D410 combines the business class performance of the Latitude family with the convenience and portability of a light and compact form factor." A couple specs: 2.13GHz processor, Windows 7, 533MHz DDR2 SDRAM, 80GB hard drive. There's many more features I haven't listed, so hop on over to the website (or stop by the library) to check it out.
Library Catalog
Manual
Loan Period: 2 days
TI-89 Graphing Calculator (2)
 This is a beast of a machine! It comes with 16 preloaded apps, a built in USB port and extra memory. It can do physics, chemistry, statistics, and math. I would recommend getting familiar with it before using it on a test! Runs on four AAA batteries.
Library Catalog
Manual
Loan Period: 2 days
Bamboo Tablet (1)
 Imagine using a pen instead of a mouse for your computer. You've essentially just pictured a Bamboo Tablet. You plug it into your computer's USB port and that's it. No more mouse. Taken from the Wacom website, this pen is "precise, natural, and so much more comfortable than other input methods, the pen is the ideal tool to use when annotating, drawing or photo editing." It takes some getting used to, but it's definitely something worth trying at least once.
Library Catalog
Manual
Loan Period: 2 days
Keyboard (1)
 Always wanted to play the keyboard but never learned how? That's ok, our keyboard has 100 built in songs with keys that light up. It even waits for you to catch up and hit the right key! It's a perfect way to show off your skillz. Besides the lights and the range of songs, the keyboard also has three lessons for each hand, grading for those lessons, a chord dictionary, 367 voices (pianos, electric pianos, drums, guitars, etc), and a handful of other cool features. It runs on six AA batteries or a 12-V power cord.
Library Catalog
Manual
Loan Period: 2 hours/In-house use only
Headphones (11)
 We have several different types of headphones, from ones with mics to your regular old ones. Stop by and have a look.
Panasonic stereo headphones RP-HT355 Library Catalog
Telex 610 headphones Library Catalog
USB Headset Library Catalog
Manual
Loan Period: 4 hours/In-house use only - 2 days depending on which one you want to check out
Voice Recorder (8)
 We've even got voice recorders in the library! What for? Well, say you have a professor that talks like he's at an auction - there's no way you can write down everything that's said. So you check out a voice recorder, record the lecture, then play it back and take notes. Depending on the model, recording times range from approximately four hours and 20 minutes to 27 hours and 20 minutes! That's not too bad, if you ask me. The battery life is also pretty good, getting about 13 hours on one AAA alkaline battery, and about 12 hours on one AAA NiMH battery charge. You can even upload the recordings to your computer.
Library Catalog
Manual
Loan Period: 2 days
Mics (5+)
 Mics, along with headphones and digital cameras, have several different types for you to choose from. We have condenser mics, which are used for recording instruments, to mics for recording the sound for your movies.
Condenser Mic Library Catalog
PRO 88W VHF Wireless Microphone System Library Catalog
TwinMic Microphone System Library Catalog
Wireless Mic Library Catalog
Manual
Loan Period: 2 days
Chess Set (1)
Want to learn how to play chess? Well, stop by the library and check out the chess set! You can borrow it for up to three weeks, so you have plenty of time to get at least the basics down. Who knows, maybe you'll be the next Bobby Fischer.
Library Catalog
Loan Period: 3 weeks
Boom Box (2)
 A boom box?! But no one uses those anymore, right? Wrong. We've got one, so of course that means they're still cool, yeah? It runs on 6 AA batteries or a power cord. It even plays CDs!
Library Catalog
Manual
Loan Period: 2 days
Slide Projectors (2)
 What do we have to go along with our boom box? A slide projector! It comes with an 80 slide tray (for one model) and a 140 slide tray (another model).
Kodak Ektagraphic III A Projector Library Catalog
Kodak Carousel Projector Model 550 Library Catalog
Manual
Loan Period: 2 days
Gorillapod (3)

Library Catalog
Loan Period: 2 days
If you're looking for something bigger, we also have regular tripods.
The loan period on them is also 2 days.
Kindle (1)

Library Catalog
Manual
Loan Period: 3 weeks
Flip Video (10)

Library Catalog
Manual
Loan Period: 2 days
miniDV Camcorders (4)

Library Catalog
Manual
Loan Period: 2 days
Digital Cameras (8)

Library Catalog
A510 Manual
A560 Manual
A1200 Manual
Loan Period: 2 days
Laptops (8)

Library Catalog
Manual
Loan Period: 2 days
TI-89 Graphing Calculator (2)

Library Catalog
Manual
Loan Period: 2 days
Bamboo Tablet (1)

Library Catalog
Manual
Loan Period: 2 days
Keyboard (1)

Library Catalog
Manual
Loan Period: 2 hours/In-house use only
Headphones (11)

Panasonic stereo headphones RP-HT355 Library Catalog
Telex 610 headphones Library Catalog
USB Headset Library Catalog
Manual
Loan Period: 4 hours/In-house use only - 2 days depending on which one you want to check out
Voice Recorder (8)

Library Catalog
Manual
Loan Period: 2 days
Mics (5+)

Condenser Mic Library Catalog
PRO 88W VHF Wireless Microphone System Library Catalog
TwinMic Microphone System Library Catalog
Wireless Mic Library Catalog
Manual
Loan Period: 2 days
Chess Set (1)
Want to learn how to play chess? Well, stop by the library and check out the chess set! You can borrow it for up to three weeks, so you have plenty of time to get at least the basics down. Who knows, maybe you'll be the next Bobby Fischer.
Library Catalog
Loan Period: 3 weeks
Boom Box (2)

Library Catalog
Manual
Loan Period: 2 days
Slide Projectors (2)

Kodak Ektagraphic III A Projector Library Catalog
Kodak Carousel Projector Model 550 Library Catalog
Manual
Loan Period: 2 days
Thursday, January 12, 2012
How to Create Your Own Embed Code
This blog will show you how to create your own embed code. Your code can be really simple or you can make it more in-depth. Creating your own code gives you much more freedom (and satisfaction when it works how it's supposed to) than a code generator.
This is the simplest form of an embed code:
<"embed" src="your video URL here" height="video height" width="video width"><"/embed">
You'd have to take out the "" around both embeds.
- src tells the code where to get the video (which is why you put in the video URL).
- The height and width sets the height and width of the embeded video
It's important to note that if you set the height and width bigger than the actual number of pixels, the video won't distort but there will be added space around your video.
There are also other features you can add to your code to jazz it up.
autostart This is a true/false value. It sets to auto play your video.
hidden True/false value. Hides your video.
loop True/false value. Continuously loops your video
So, for example, let's say you wanted to embed a video that autostarted and looped, and your height and width were 256 and 320, respectively. Your code would look like this:
<"embed" src="my_video_url.mp4" height="256" width=320" autostart="true" loop=true"><"/embed">
There you have it! You've just created your own embed code.
Wednesday, January 11, 2012
How to Embed a Video Into a Blog
Here in the library, we get a lot of questions on how to embed videos into blogs. The process isn't too complicated and I've created a simple, step-by-step guide with pictures on how to do it. This post is on how to embed videos from YouTube.
1. Find the video on YouTube you want to embed.
2. Click "Share"

3. Click "Embed"

Now, a box underneath the video should show that looks like this:

Before, we go any further, I should explain what all of this means.
The highlighted part is the actual embed code. This changes as you change your settings. It's important to make sure you're completely done before you copy the code, otherwise any changes you made after copying will be lost (since the code won't reflect those changes).

These four check boxes are the the semi tricky part.

- The first one, "Show suggested videos when the video finishes", is checked by default. What it does is, well, shows videos that it thinks you might want to watch, based on this video. It doesn't really matter if it's checked or not.
- Have you ever been browsing the Web when, after going to a new page, you've gotten that little box that pops up saying something like "Not all content is secure. Would you like to display the non secure items?" with two little boxes, to click either yes or no? Basically, that non secure stuff is not accessed using HTTPS. What that means is that HTTPS wraps a layer of encryption around the information and enhances the privacy (a lot of times it's used for making online payments). Checking the "Use HTTPS" box, can help you avoid that annoying secure content box. Again, it doesn't really matter if you check it or not.
- This third box, "Enable privacy-enhanced mode", has to do with cookies (no, not the kind you eat). Cookies basically collect information. By checking this box, you're restricting YouTube's ability to set those cookies - as long as the user doesn't click on the video (to go to YouTube directly, for example). Once it's been clicked on and you've been taken to the site, YouTube can set cookies, but it doesn't store any personal information.
- The fourth - and final - box, "Use old embed code", gives you, well, the option of using the old embed code. The old code only supports Flash playback, while the new code supports both Flash and HTML5 video, which has to do with web developers being able to add video like they would an image. It doesn't require a second application in order to watch the video. It's pretty cool, the only drawback being that some services only support the older code. If you get an error, my advice would be to go back and try the old code.
And now we come to the last part before we can copy the code. Here is the part where you get to pick how big your video will be. You have a choice of four preset sizes, or you can make your own custom size.

4. Copy the embed code.
5. Log onto your Blogger account.
6. Select "New Post" on the blog where you want your video to be.

7. Paste the embed code into your blog. Before you do though, make sure you're in the "Edit HTML" tab and not the "Compose" tab, otherwise instead of a video, you'll just get the code.

8. Click "Preview" to make sure everything looks how you want it to.

9. Click "Publish Post"

10. You're done!

Subscribe to:
Posts (Atom)